EE Enigma 0 Degree Quilt – The Rotisserie Sleeper

Note: I paid full price for this quilt and am reviewing with no benefits, just enjoyment of being a nerd 🙂

So I was looking for a light/ultra light sleep system. I was sick of being cold in the sub alpine. I was sick of waking up all tangled in the night facing the back of my mummy bag or constantly having to pull up my ZPacks bag as it would shimmy down to my hips. I was intrigued by quilts. That was my headspace when I contacted Enlightened Equipment for information regarding a new sleeping bag or quilt.

First and foremost, I have to give a huge shout out to Jacob at Enlightened Equipment. I asked a ton of questions and he was happy to really drill down and give me piece of mind.

Things he told me (summarized):

  • As of November 2017 they include a 5% overstuff, so cold sleepers unite!
  • I asked if 950 of the same rating would be any warmer at all, he assured me no, just way more compressibility and lighter for us gram weenies.
  • I asked about dead spots. I tolerate my ZPacks 20 degree bag especially for summer, but I never truly loved it. Some folks mention it may be due to the baffle direction being horizontal, as it sometimes gets dead spots where I feel cold air coming through as the down shifts and moves. Jacob mentions that however it does happen with all down products they do try to limit it with their baffle design. He also linked me to their Distributing Down link which provides tips on how to mitigate.
  • Finally, I am a rotisserie sleeper. This means I roll front to side to back all night making most mummy bags a hot mess of tangled and twistedness. Jacob recommended I upsize to a regular despite fitting in a Slim. Also the bags cinch around your nose based on the height, so he recommended a regular length to be able to really hunker down at 5’6.

Considering it is a ton of money to spend on a sleeping bag, I was really pleasantly welcoming to all the fantastic support and reassurance he provided.

The EE Enigma 0 degree 950 quilt in regular width arrived and weighed in at 23.1oz with the straps. I found this wonderful YouTube link from Enlightened Equipment on how to strap in for the night. The quilt has a closed footbox, and no zipper. There are two male female type straps on the quilt one for a strap that is a loop around your mat that can be adjusted and another that is a U. I ordered some additional straps for a few dollars after learning I preferred the loop type strap and wanting two of them. I wish they shipped stock with two of the loop type straps…

There are some snaps around the collar and a draw string at the top of the quilt to really cinch you in.

I paired this quilt with the Neoair X-Therm sleeping mat. It is a 4 season mat at 16oz that has an R value of a whopping 5.7. With a quilt you sleep directly on the mat so having a warm mat is vital. I have purchased an Enlightened Equipment mat cover that weighs only 1.5oz and is extremely silky smooth, to prevent sticking to the mat, and sweating on the mat dirt and grime.

I have taken this quilt out a handful of times so far, and have been plenty warm. I took it recently to around 6-10 degrees Celsius 40-50F, and actually had to remove clothing layers during the night as I was too warm. The nice thing about the quilt is you can pop open a draft or loosen how cinched the straps are or just use it like a blanket sans straps.

Earlier in the shoulder season I took it out around freezing temperatures, and just wore a normal base layer no puffy and felt no issues with temperature. I did have the quilt cinched fairly tight with the straps for that evening as we were next to a lake.

Overall this quilt is a huge winner in my books, it lofts huge, is soft to the touch and Enlightened Equipment are a class act company. I will be taking it into the High Sierra for 12 days this fall and look forward to running it through its paces in the sub alpine.

Happy hiking!

New Year – New Plans!

As the 2017 year comes to a close, and we are full on into the dead of winter, I feel it is time to reflect on a few things, and maybe check in and see what we have in store for 2018.  Do you ever stop and think “Holy Crap, its 2018… Y2K was 18 years ago!!??”  I do 😛

22256467_10159554119035128_3300134542664298582_o


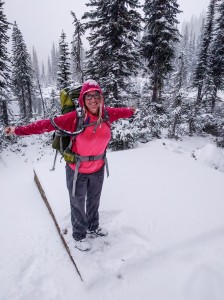
So… what have I been up to while we wait for hiking season to begin again?  Well my last hike was around the Thanksgiving weekend (the Canadian one, late October),  we were graced with about 8″ of snow while camping.  Our plans to summit Mt John Carter were squashed, so move that adventure to next year’s bucket list. This is the photo when we first arrived at our tent pad in Kokanee Glacier Park.  We still had a fun time in the snow; it’s always fun to do some colder weather camping!


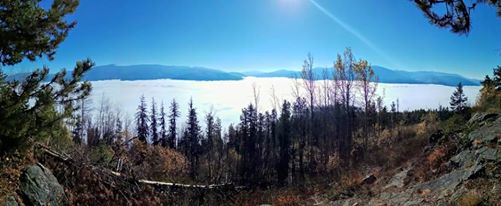
We also managed to do some nice local day hikes, as the shoulder season was upon us.

22789151_10100406566162857_3853635034222217487_n

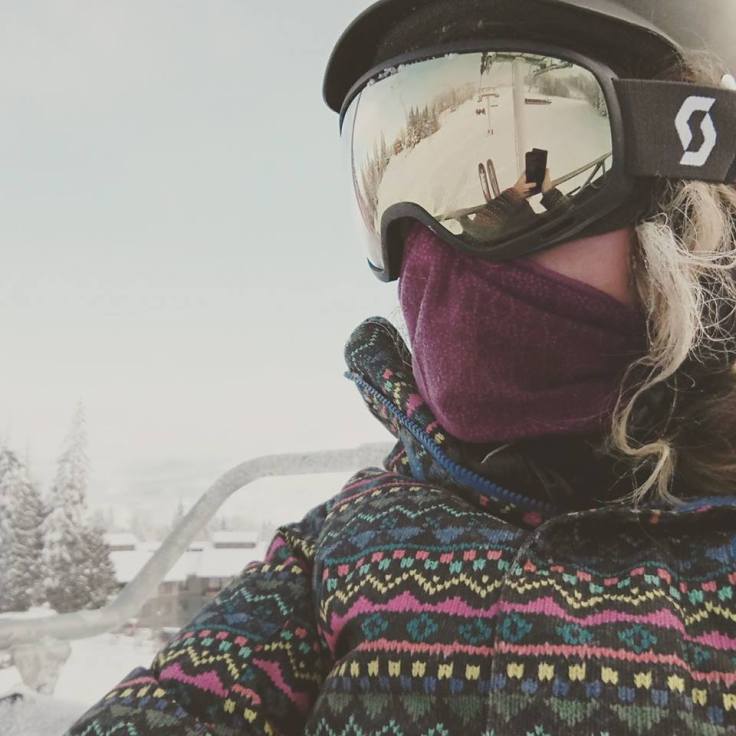
But now, as temperatures are commonly hitting around 1°F/-17°C over the various mountain passes, it’s ski season!  I picked up a pair of on-piste ski’s and boots for $50 in the classifieds – perfectly fine shape to learn on! Me, enjoying some time on the hill:

25591771_10100426987697937_8817588809867051124_n.jpg

Looking into the new year, I have a few big plans in the works.  I’m going to try my hand at getting a Wonderland Trail Permit for later in the summer/early fall.   Also, I am looking at hiking the Chilkoot Trail in three days in late summer.  This trail connects Skagway, Alaska to Whitehorse, Yukon, Canada.   I have already scheduled one half-marathon for the end of May, and probably will do another one later in the summer, as well as a 10K trail run.  I look forward to providing posts surrounding planning to the bigger hikes.

In the gear front, I have gotten some pretty awesome stuff over the past month!  I cannot *wait* to have a few nights in my new tent to review the Six Moon Design Lunar Solo – this tent will be my first single wall and the price point is really decent!

I also bit the bullet and just ordered an Enlightened Equipment Enigma Quilt for 0F (I had a -20F bag, and a 20F bag – felt I was missing that middle range).  This bag is my first quilt ever and I look forward to reviewing it after several nights.

Happy New Year and Happy Hiking!

Let me know what you have planned for 2018!

Review – ULA Circuit

At one point I had five packs.  I have finally paired it down to three, but there is one pack I keep going back to over and over again for day hikes, weekends and longer trips.  The 55L ULA Circuit.    This pack looks a bit different, especially if you typically buy the standard Osprey, Deuter or Gregory packs at MEC or REI.  I love my Deuter 70L and my Deuter 35L but this is the one I keep reaching for…

IMG_20170917_085751

What makes this pack unique?

  1. 41oz (1100g) – most packs you normally find in this size are 50-70oz.
  2. Roll top closure – most packs cinch and have a bran that sits on top.
  3. Lots of straps and huge side pockets.
  4. A front pouch that seems at times to be a  bottomless pit.
  5. Option at purchase to pick size and hip belt shape.

This bag is not for everyone, it does not have a frame.  Instead it has a carbon fiber hoop and an aluminum stay that is curved.  Also, it has a weight limit suggestion of 35lbs which means you should be a pretty light packer.

For my big twelve day trip recently, I went over the recommended weight limit of 35lbs as I had 12 days of food at 16lbs.  Day one, 12 miles, 4500ft and 41lbs of gear, was it comfortable? No.  Did I make it? Yes.  By day two, I had figured out that packing my inflatable sleeping mat folded between my back and my bear can prevented the discomfort of the bear can poking into my back.  By day three, I was probably around 38lbs and was feeling no discomfort.  Every day after that, I had zero issues and I became the master of packing that pack.

IMG_20170919_110314

How I Packed my bag changed as I learned what worked, here is my final system with a full Bearikade Expedition:

  • Put all my down gear, sleep clothing, and down bag loosely in a garbage bag and stuff to the bottom.
  • Slide in the canister but ensure to position it in the middle (there will be a lot of space on either side.
  • Take the sleeping mat and fold it into a large rectangle and slide it down the back of the bear canister to keep it off your back
  • Slide different gear down the sides of the canister (like rain gear etc;) taking care to make sure the canister stays center.
  • Tent in one side pouch
  • Tent stakes in other side pouch with 1L smart water bottle and optionally filled 1L platypus also fits there.
  • Every other odd and end in the front pouch (fuel, map, first aid).  Foam mat and flip flops were under the para-cord
  • Solar panel tied using back up laces to the roll top enclosure to hang off.

Note: Future me has switched from a two person tent to a one person Six Moon Lunar that is a) smaller and b) uses a stake.  I might try to put it in the bag.

Note 2: Future me has procured some ultra light smart water bottle holder that can hang off the front straps of the pack.  Again freeing up one of the side pouches – so many possibilities!

As I go lighter and lighter in my gear this pack is everything I ever wanted ❤

IMG_20170919_151535

Update: Gear Review – Blue Desert SmarTube Hydration System – Inline System!

I did a gear review recently for the Blue Desert SmarTube Hydration System, that was very favourable.  I decided to go ahead  and order a second one to modify for use as my inline system for my upcoming Big SEKI Loop (which I have now dubbed the Big Sexy Loop 🙂 )

I measured the tubing so the portion in the bottle would fit in both my 1L Platypus and my 1L SmartWater bottle (used and recommended because it is super light and the shape fits very nicely in packs, as well as durability), all the way to the bottom.  I then left a small amount to go through the bottle cap thread connector, and made my cut there.

The tubing fit easily over my Sawyer Mini, on the “dirty” side, and then I shortened the tube so that the distance from the Sawyer Mini to my mouth was reasonable (it’s a bit too long to start).  The mouth piece side of the tube slid easily but firmly over the Sawyer Mini clean side.

The beauty of this set up, is the ease of just grabbing “dirty” water and continuing on. The suction through the Sawyer mini is perfectly fine and sipping water has no issues. Removing the hoses from the Sawyer Mini can be a tad challenging (I use the non sharp side of the knife to pry it down).  Fortunately, if you keep your water sources choosy, you shouldn’t need to back flush too often.

I have tried it now on a couple weekend hikes and day hikes with no issues. I will be taking this setup with me on a 10-14 day trip to really test it out.

Happy Hiking!

Blog at WordPress.com.

Up ↑